1 Introduction
With the Sandberg USB 2.0 Hard Box 2.5'' (referred to as “the box”) you can reuse an old SATA hard disk from a laptop as a handy external portable storage device. The hard disk is easy to fit into the box, which can be protected in the enclosed storage pouch when you are on the move. The box receives power from a USB port so there’s no need to look for a power socket. The backup button on the box and the enclosed backup software allow you to easily use the box to make backups. The box can of course also be used with new hard disks.
2 Fitting
- Remove the box’s top and bottom plates. The easiest way to do this is to hold the silvercoloured frame while carefully “shaking” the plates off.
- Connect a hard disk to the SATA connectors on the printed circuit board.
- Turn over the plastic frame and use the screws provided to secure the hard disk in place.
- Fit the top and bottom plates so that the small pins at the end of the plates and the studs on the sides of the plates click into the plastic frame.
- Screw the plates firmly to the sides of the plastic frame.
3 Connection
Use the enclosed USB cable to connect with the box:
- Connect the cable’s mini USB connector to the box’s USB port.
- Connect the cable’s two USB connectors to two USB ports on your computer. The black connector provides a signal and the red connector supplies extra power to the hard disk.
- Turn on the box using the switch on the back of the box.
4 Installation
4.1 Installation in Windows
When you turn on the box, a new drive is created on your computer. You can use this drive in the same way as any other drive on your computer.
4.2 Installation in Mac OS
- The dialog box “Do you want to use “(null)” for backup with Time Machine?” appears.
- Click “Cancel” if you do not want to use the hard disk for backup. A new drive is created on your computer. You can use this drive in the same way as any other drive on your computer.
- Click “OK” if you want to use the hard disk for backup with the Time Machine software. Read about the program’s functions in the documentation for your Mac computer.
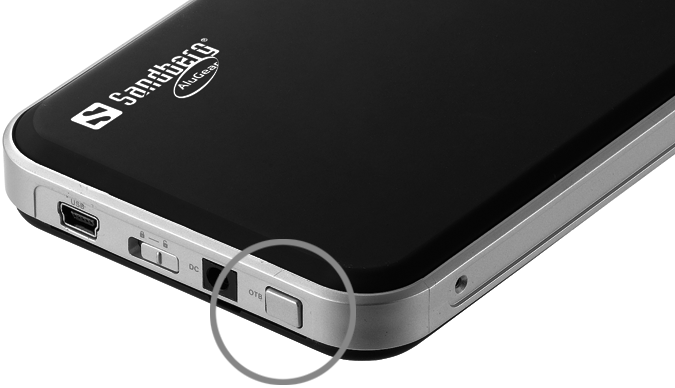
5. Backup function
On the back of the box there is a button that can be used to quickly make backups of pre-selected files and folders:
NB: This function is only available in Windows as Mac OS already offers the smart backup facility Time Machine. The following section is therefore of no relevance to Mac OS users.
5.1 Installation of software
- Insert the CD provided.
- Open the PcCloneEx folder and then the “Setup.exe” file.
- Click “Install”, “Next”, “Install” and then “OK”.
The program is now installed and ready for use.
5.2 Use of backup software
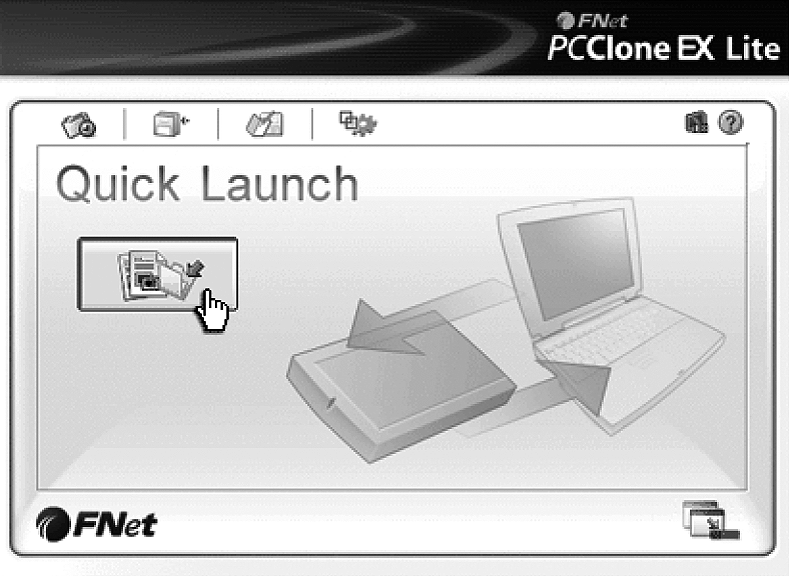
- You have a new icon in the notification area. Double-click it. The PCClone EX Lite program launches.
- Click the Files backup icon in the middle of the screen.
Now select the files that you want to back up. On the left-hand side of the screen you will see your computer’s disk drive and on the right-hand side the hard disk / the hard disks connected to the adapter.
- Select the folders and files on the left-hand side of the screen that you want to back up.
- Press the button on the top of the adapter. A window will open on your screen.
- Press the button again. Backup of the selected files starts.

Every time you want to make a backup copy of the selected files in future all you have to do is press the button.
If you would like to change the files and folders which are backed up, click the “Files backup” icon in the PCClone EX Lite program.
NB: Your backups will be saved on the drive in a hidden folder called FNET. If you want the folder to be visible, you must select ”Show hidden files and folders” in Windows’ Folder view.
6. Troubleshooting
6.1 Partitioning
If this is a new unused hard disk, it has typically not been partitioned. This can be done so as follows:
- Open Disk Management under Administrative Tools -> Computer Administration in the Windows Control Panel.
- Highlight the hard disk’s unallocated area:
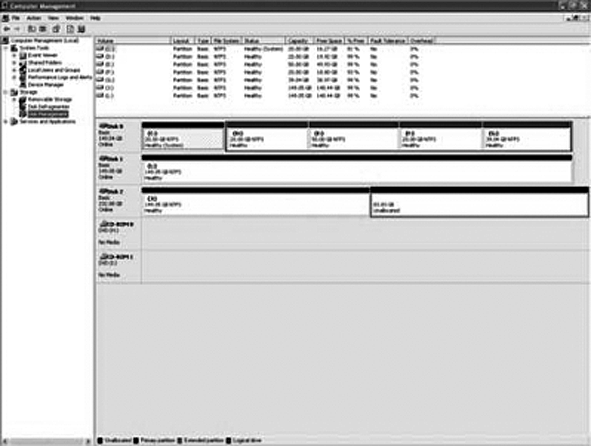
- Right-click and select “New partition/volume”. Follow the instructions on the screen to allocate the desired size and drive letter etc. to the partition. We recommend selecting primary partition, maximum possible capacity and formatting in NTFS file format.
- Formatting begins, after which the partition is completed and can be accessed like any other drive.
6.2 No connection
- Please note that the box must be connected directly to the computer’s USB ports, not through a hub.
- Try moving the USB connectors to other USB ports on the computer.
- Check that the on/off switch on the back of the box is switched on.
- Check that the hard disk is correctly connected to the SATA connectors on the printed circuit board.
If you need further help or assistance with your Sandberg product, you can visit the website http://helpdesk.sandberg.it.
Have fun with your Sandberg USB 2.0 Hard Disk Box 2.5”!
|